Hunt & Gather UK
  • Hunt and Gather UK
  • About

Smoking your Wild Harvest

9/27/2014

0 Comments

 
Picture
Hot Smoked Wild Sea Trout
There seems to be something of a mystery around smoking and curing foods, an ancient skill around since before the ancient Egyptians but now only seemingly practised by either niche artisan producers or large commercial enterprises.

Just to clarify - there's hot smoking which involves cooking your food directly with heat whilst infusing smoke for both flavour and providing some additional preservative properties and cold smoking which is an indirect method of preserving food which essentially remains raw.

I'm going to focus on hot-smoking as the kit, time and effort required is far less and results more instantly tasty. In just a few words I'll aim to show you just how simple this skill is and that, once learned, it becomes a "life skill" - applicable in so many situations from the kitchen to the woods or riverbank.. and with oh so many foods! 

The first step is obviously to have caught, shot or bought something to smoke - there's not much that won't joyfully take on the savoury, salty tones - from duck, goose, sea trout, chicken, an otherwise boring turkey drumstick or even a shop bought steak or portion of pork belly (pork tenderloin is especially good).


So where to start?

Simply - make a "cure" mix.

By curing your item you'll enable the smoke to penetrate and stick to the food. If you don't cure it there'll be the smoky smell but the taste just evaporates disappointingly in the mouth.

Nothing complicated here - get a large kitchen bowl and empty into it a bag of pre-dried vacuum (PDV) or table salt. Add exactly the same amount of demerera sugar and mix thoroughly.

Now you can also add additional flavour to this mix by adding crushed dried bay leaves, juniper berries, peppercorns... go wild and experiment but essentially this is your basic cure mix that'll keep forever in a sealed container and you'll only ever use a little at a time.

So, make sure your object of smoky desire is thoroughly dry using a tea towel and sprinkle a non-metal tray or tupperware with a little of the mix. Add the item and then sprinkle some more mix on top ensuring you pack any spill over into the sides.

You want to fridge the tray now for 15-18 mins for fish, longer for larger pieces of red meat e.g. venison.
Picture
Sea trout fillets curing
Picture
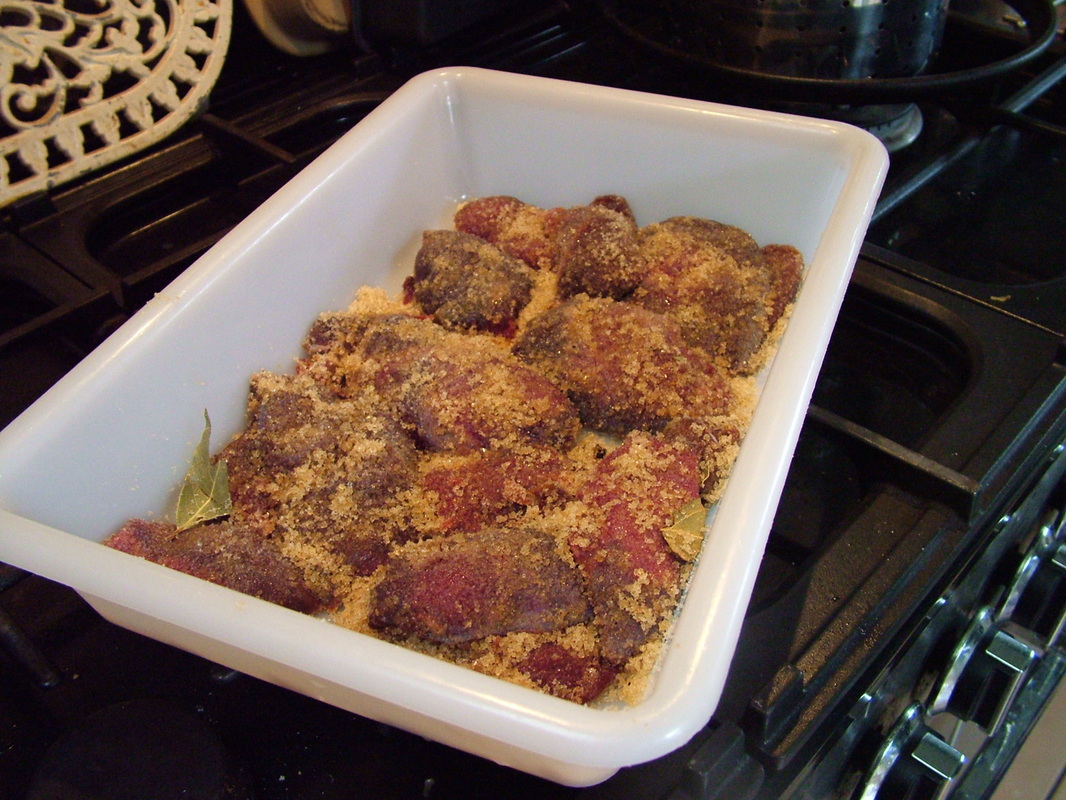
Medley of pintail, teal and mallard breasts curing
When the time is up take the tray out and rinse the cure off the item thoroughly and then, once again, pat it dry with a tea towel - you'll notice a change in texture and it should feel firmer from the moisture the cure has drawn out of it.

Now fire up your BBQ - almost any will do as long as it has a lid and preferably ventilation holes - the kettle-style made by companies such as Weber are perfect.
Picture
Weber "Jumbo Joe" and chips/herbs ready for smoking - note the position of coals away from the cooking tray
Get your coals nicely ashed over and soak some wood chips for 5 mins. Almost any fruit wood (pear, apple, cherry) or hard wood (particularly oak, beech, hickory or hazel) will do - I collect mine after chopping seasoned logs for the winter woodstore.

I'd also recommend picking some fresh herbs from the garden to suit your food - bay, tarragon, fennel etc. for fish or thyme, rosemary and/or sage for red meat - they'll add an additional boost of lovely oily smoke on top of the wood chips.
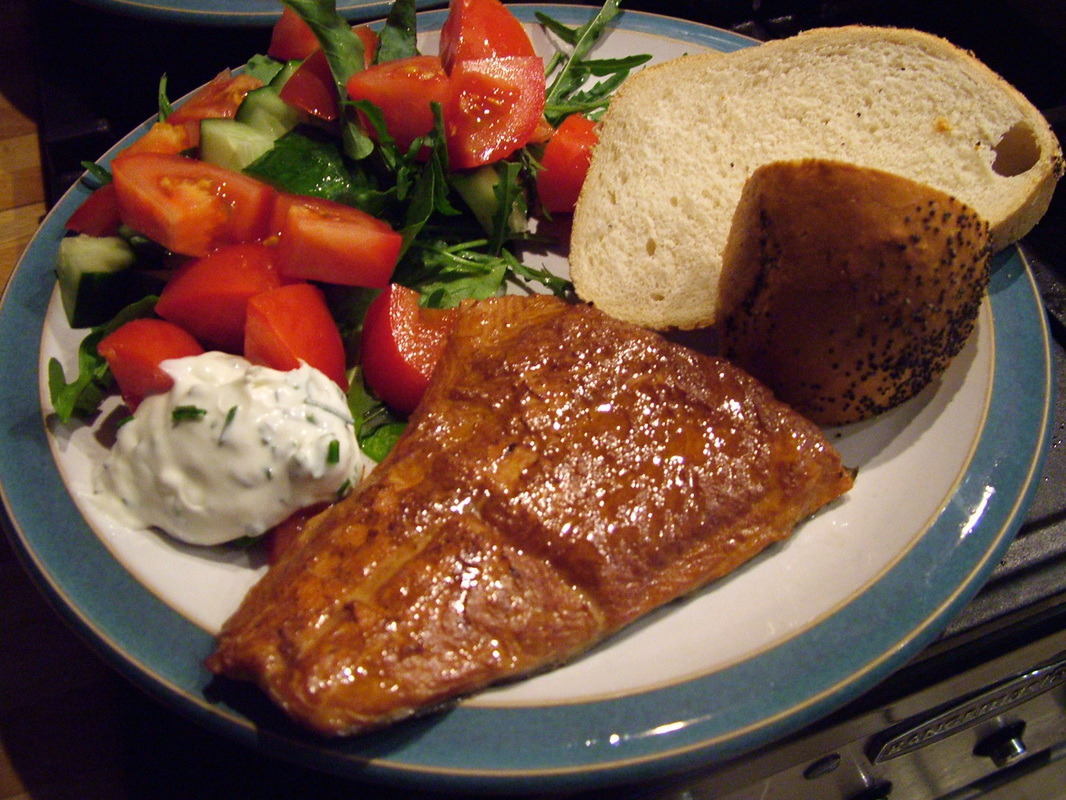
You'll need a tray which could be a shop-bought aluminium one with holes (perfect) or as pictured a doubled up sheet of kitchen foil with the edges crimped up. Place the item on the tray, add the chips and then the herbs to the coals, cover with the lid and ensure there's some ventilation, but not too much - you want that smoke in there as long as possible but without losing the barbecue heat. 

You may need to shuffle the coals and chips once or twice to keep the smoke coming but essentially you're now only relying on your BBQ skills.

For fish you want to achieve the rich golden colour of smoked mackerel - firm but moist.

For red meat you'll need longer and cook to your preference but keep duck and goose rare, you can always finish off sensitive cuts like pork tenderloin in a pan rather than risk overdoing them on the 'cue.

Again you'll be looking between 15 and 30 mins depending on what you're cooking and it'll need a good few minutes resting afterwards.

For fish I can't think of anything better than freshly home-baked bread, salad from the garden with a light vinaigrette dressing... for meat, especially duck, slice rare and serve with a bitter endive and chicory salad with a fruity dressing.
Picture
Picture
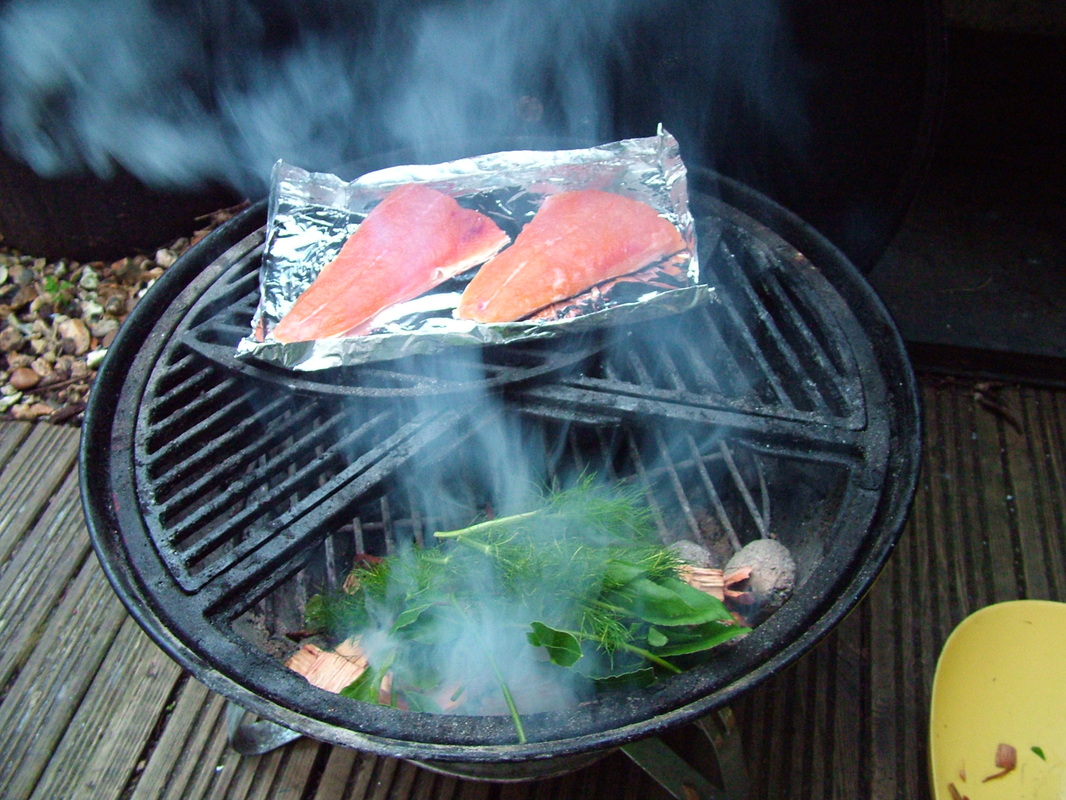
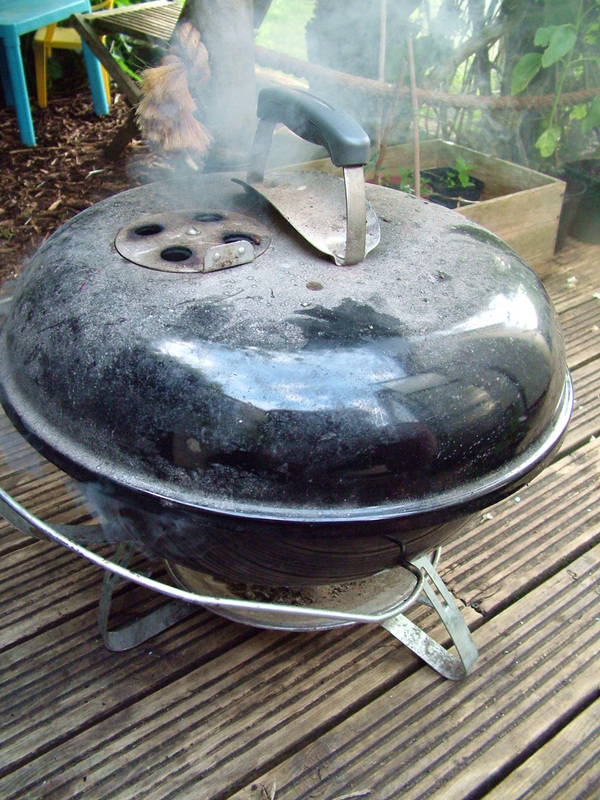
So there you have it, nothing too complex or taxing - just a short time in a simple cure mix and you evolve from average "BBQ Joe" to "Culinary Wizard". Perhaps take a pot of mix and a portable bbq the next time you go shooting or down to the beach with rod in hand... the possibilities are endless.

Happy smoking!

Jon
Picture
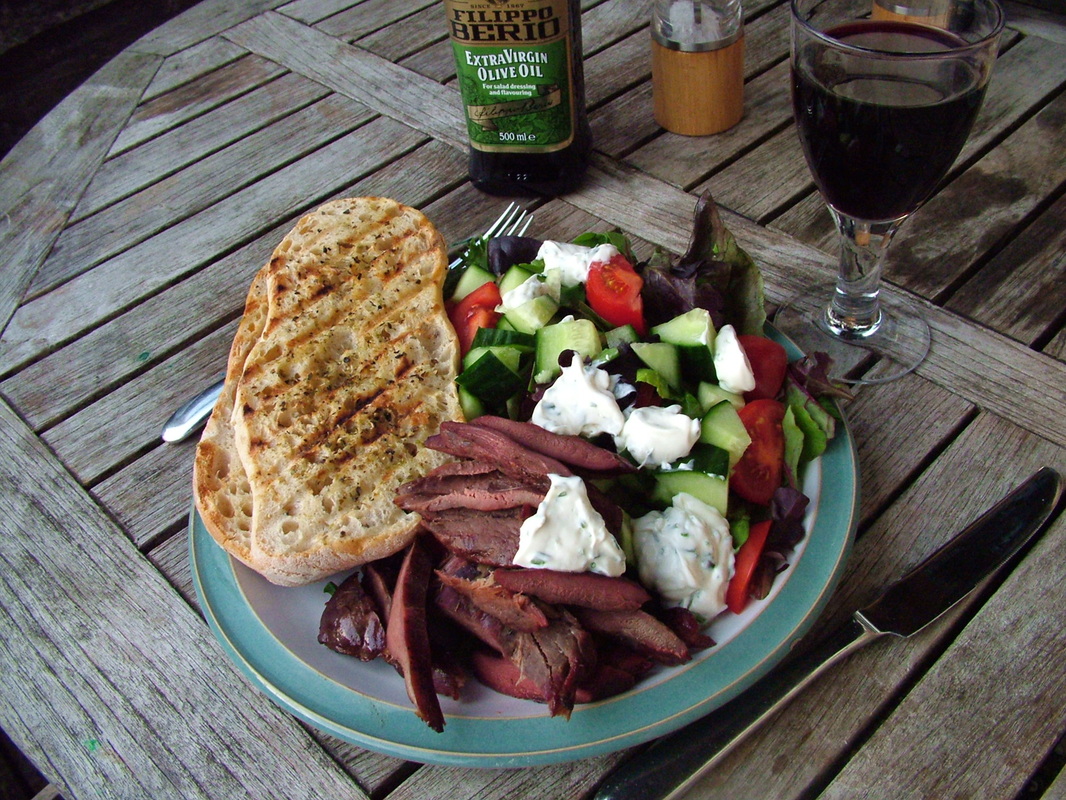
Smoked wild duck, sour cream and chive dressing and garden salad... go on give it a go
0 Comments

Plum Liqueur

9/27/2014

0 Comments

 
Picture
Plum Liqueur

Plum liqueur:

1. Place the vodka, plums and sugar in a large saucepan.

2. Bring to the boil and simmer until the sugar has dissolved. Allow to cool.

3. Transfer the vodka plum mixture into two bottles and store in a dark, cool place for 3 months.

4. Optional: Strain the plum vodka through muslin and bottle in 2 clean bottles; or keep plums in liqueur to make a compote.

INGREDIENTS

1 bottle of vodka

450 g plums, halved and stoned

225 g sugar

0 Comments

Tomato Salad made with Homegrown Tomatoes.

9/21/2014

0 Comments

 
Picture
Tomato Salad made with homegrown tomatoes.

Things don't have to be complicated to be good.

I have fond memories as a child, whilst on holidays in France, of eating fresh tomato salad. Mopping up the juice afterwards with French bread.

Ever year when my tomatoes are ready. I recreate this childhood dish. I still love it as much these days.

Covered with a simple dressing made from good olive oil and vinager. Then add few pinches of sea salt and freshly ground pepper.

Occasionally I add mustard or garlic to the dressing.

I still mop up the juice left behind, with some good bread.

Simple, quick and delicious. You also get to cherish the true flavour of these freshly picked homegrown tomatoes.

Picture
This is all the ingredients that you need to make a variety if tomato salads.
0 Comments

Elderberry Wine

9/18/2014

0 Comments

 
Picture
Elderberry Wine

Elderberry wine; they are plentiful at the moment. It tastes better than it smells ;)

Ingredients:

1.5kg Elderberries.

1.5kg Sugar

1tsp Citric Acid.

4.5l Water

1 sachet of brewers Yeast and 1 teaspoon of Nutrient

Method:

Strip the berries from the stalks using a fork.

Crush them in a bowl and pour on the boiling water and add the sugar.

Let it cool to until warm (21 degrees approx) then add the yeast, nutrient and citric acid.

Loosely cover for 3 days and then decant into dark bottles (stops the wine losing its colour) and leave with either an air lock or cotton wool until the vigorous ferment has completed.

Once the ferment has completed siphon off into the final dark bottles to lay down for a minimum of 6 months.

Enjoy on its own or as an addition to a summer martini!

0 Comments

Pear Wine

9/18/2014

0 Comments

 
Picture
Pear Wine

A great way to use up those pears!

Pear wine:

1. You will need a white 9 litre capacity plastic bucket with lid, wooden spoon, 2 x 4.5 litre glass demijohn, rubber bung (with hole), plastic air lock, plastic siphon tubing, sterilising powder, large plastic funnel, 2 x empty 2 litre screw top plastic bottles, 1 x empty 1 litre screw top plastic bottle.

2. Pour the boiling water over the pears, pressing well to extract the juice. Leave for 4-5 hours.

3. Add the pectic enzyme. Cover and leave for 4 days to infuse.

4. Strain the pears through muslin and pour the liquid through a large funnel, into the demijohn.

5. Add the sugar and lemon juice.

6. Add the yeast and yeast nutrient and fit the airlock. Keep in a warm room.

7. After about 7-10 days, when the wine begins to clear and the bubbles have slowed down, siphon the wine off the 'lees' (the debris in the bottom of the demijohn) into a clean demijohn.

8. After about another 3-4 days, when all fermentation has stopped (no more bubbles through the air-lock), siphon off the 'lees' into clean demijohn. Add a Campden tablet - Campden tablets are used to kill naturally occurring wild yeasts and undesirable bacteria.

9. Stopper the jar and leave in a cool place for a further 10 days. The wine should be clear.

10. Siphon the wine into clean empty plastic bottle and store in a cool place. The wine should be ready after about 3 months.

INGREDIENTS:

4.5 litres boiling water

1.8 kg pears

2 tsp pectic enzyme

900 g sugar

2 lemons, juice only

1x7 g sachet dried yeast

3 tsp yeast nutrient

1 campden tablet

0 Comments

Pear & Lemon Preserve

9/17/2014

0 Comments

 
Picture
Pear & Lemon Preserve

I have just made some pear & lemon preserve for the 1st time, OMG it's lovely! Would be great used as a jam, or served with pork or Stilton.

Ingredients

2 kilos (4 and 1/2 pounds) of pears, peeled, cored and chopped

3 medium lemons (strained juice and zest)

1 kilo (5 and 1/4 cups) of granulated jam sugar

1 litre (4 and 1/4 cups) of water

Instructions

Prepare the pears and place in a large covered bowl, to stop them browning.

Remove the zest from the lemons carefully to avoid adding the bitter pith. Set zest aside.

Squeeze the lemon juice and strain.

Add the water, chopped pears, lemon zest and juice to a large heavy bottomed saucepan.

Simmer very gently until the pears are just soft.

Pour in the sugar and stir over a medium/low heat until the sugar is dissolved.

Bring the heat up to a rolling boil.

Allow to boil hard for ten minutes before testing for a set.

If it has not reached setting point (what is setting point? See Tricks and tips below) continue to boil rapidly, checking for a set every four minutes or so (set the timer for this).

When the jam has set remove from the heat.

Allow the jam to stand for a few minutes and pour into warmed sterilised jars (how do I sterilise jars? See Tricks and tips below).

Cover with screw top lids or wax disks and cellophane tops.

0 Comments

Tuscan Rabbit Stew

9/14/2014

0 Comments

 
Picture
Tuscan Rabbit Stew

A recipe from a friend of mine.

Tuscan Rabbit Stew:

Flour the rabbit, fry till golden & put in pressure cooker. Add tomatoes thyme and garlic. Add white wine and balsamic vinegar and cook till tender.

0 Comments

Rhubarb Crumble

9/14/2014

0 Comments

 
Picture
Rhubarb Crumble

Home made Rhubarb Crumble.

I have been adviced to try Rhubarb & Ginger Vodka a go next.

Any other suggestions would be welcomed.

Picture
Rhubarb from the garden.
Picture
Rhubarb Crumble ready for the oven.
0 Comments

Grouse Shooting Yorkshire

9/9/2014

0 Comments

 
Picture
Grouse Shooting in Yorkshire.

Fantastic day on the grouse moors. Being late in the season the grouse were very jumpy, this made for some challenging shooting. The grouse got up quickly, at distance and flew fast. We mainly walked them up, but also did 3 drives. 20 brace at the end of the day between 7 guns. Cracking day!

0 Comments

Avril's Pear Liqueur

9/9/2014

0 Comments

 
Picture
Pear Liqueur

Something to do with pears at this time of year.

Just about to make pear liqueur:

Ingredients

2 ripe pears,

1/2 teaspoon vanilla extract or 1 prepared vanilla pod

1 cup brandy or vodka

1 cup sugar

1 cup water

1

Wash and chop one pear, discarding the seeds and core. Leave the skin on.

2

Place one chopped pear and the vanilla in a sealable glass jar and cover with brandy. The jar should have enough room to add another cup of liquid later in the process. Seal and shake, then let steep for 5 days.

3

Chop the second pear, discarding the seeds and core. Add it to a pot, along with the water and sugar, then stir and bring to a boil on medium heat, about 5 to 7 minutes. Reduce heat and simmer for an additional 5 minutes. Let the syrup mixture cool.

4

Once cooled, pour the syrup (with the fruit) into the steeping jar. Shake and let steep for 2 days. Taste, and if desired flavor is achieved, strain through a fine mesh strainer and then a coffee filter into a bottle or jar.

0 Comments
<<Previous

    Categories

    All
    Cooking
    Deer Stalking
    Equipment
    Fishing
    Foraging
    Grouse Shooting
    Guns
    Home Grown
    Pigeon Shooting
    Poultry & Livestock
    Rabbitshooting
    Shooting
    Trekking & Wild Camping
    Wildfowling
    Wild Harvest
    Woodcock

    Archives

    May 2015
    April 2015
    March 2015
    February 2015
    December 2014
    November 2014
    October 2014
    September 2014
    August 2014
    July 2014
    June 2014
    May 2014
    March 2014
    February 2014
    December 2013
    November 2013
    October 2013
    July 2013
    May 2013
    April 2013

    RSS Feed

Powered by Create your own unique website with customizable templates.